Robert Caldini published the now famous book Influence, detailing seven ways to influence people. This of course can also be used in Ecommerce to influence people to make more purchases on your website.

Most of the points below fit into one of those categories quite well. See if you can notice as you go along, I’ll reveal the split in the end.
{Please note below is a detailed 18 step guide on how to improve your store’s conversion rate. If those steps are executed on well they should improve the CRO of any Shopify store.}
__________________________________________
Everything is downstream from your conversion rate. If you can increase that, it is the tide that lifts all else. So squeezing that lemon is well… a good lemon to squeeze.
You are probably working hard to drive traffic to your store website. Most likely you are paying for paid ads on platforms like FB, IG, TikTok, Google, Snapchat etc. Or you are posting content about your product to drive organic traffic (and everything in between). Regardless, for every percentage you can increase your conversion rate, you make your traffic work harder and perform better. You can keep the same traffic but simply make more money if your conversion rate is better.
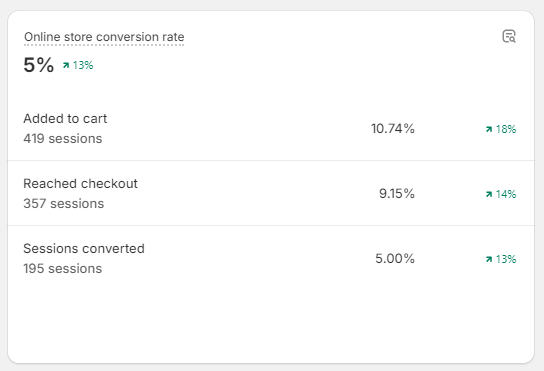
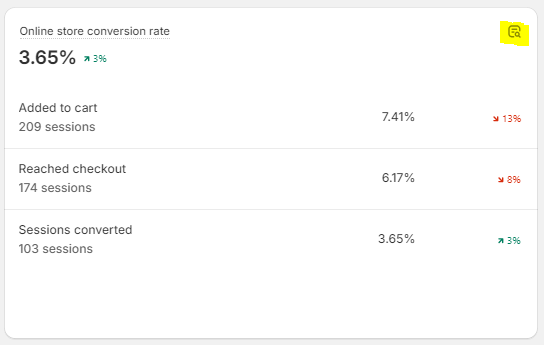
This is what I want your store to achieve with those steps (the green arrows on your analytics page). So let’s go.
1.) Optimize your Checkout Settings
Many store’s make it harder for their customers to checkout than it has to be. Keep it as simple as possible. As shown below, keep as much as possible optional!

Examples:
Customers can use Email OR phone number to checkout (let customers choose their preferred method)
Keep things like Company Name, Address LIne and Shipping address phone number etc. optional. Sure if your business model can’t live without this information, then fine. Otherwise simplify it for the customer.
Yes it makes a difference! You’d be surprised how many customers drop off last minute (or rather last second) because they got annoyed about the extra phone number they had to fill out.
2.) Change your ‘Decine Charges’ Settings
Many stores miss this one and it's counterintuitive at first. By default Shopify will automatically decline orders that fail CVV or postal code verification (see screenshot below).

Of course the intentions here are good, you prevent fraudulent orders! But there is a much better way to do it. Let all orders come through by unticking the boxes in the settings below. The ones that seem fraudulent will be flagged by Shopify on your orders page. You can then always cancel them thereafter. You can even setup a simple automation with Shopify Flow (an app), that will automatically cancel them and send an email to the customer saying they should retry with a new payment method.
Again you’d be surprised how many checkouts get bounced because it didn’t pass the postal code verification, but the customer is legit. They might just be using a company card, a family member’s card (with their consent) or a range of other reasons.
Finally, by setting up the email flow you allow the customer to change their payment method worst case. That’s much more effective (and nicer) than just kicking them off at checkout.
Basically, this way you avoid all the false positive fraudulent orders and increase your conversion rate that way.
3.) Fix your Abandoned Checkout flows
Go to your ‘Abandoned Checkouts’ Tab under Orders. Does this orange color look familiar?
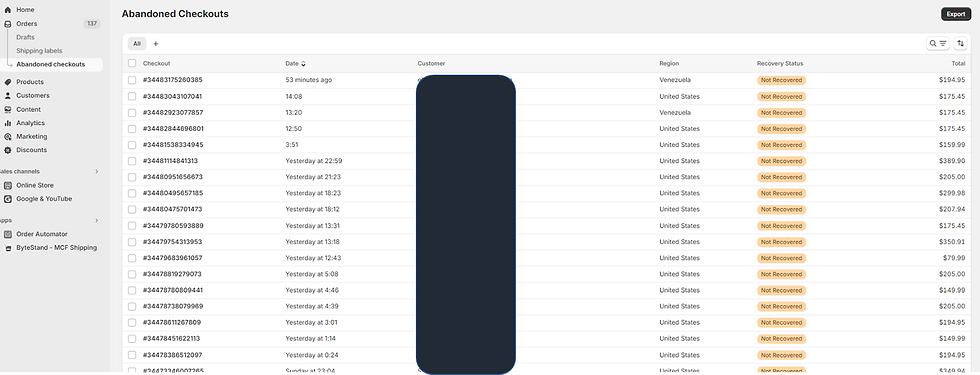
Yep not recovered… once again.
Set-up one super effective abandoned cart flow and fix this issue once and for all. Your conversion rate average will be higher from that moment onwards!
Use your favourite email app. I’ll demonstrate with Klaviyo as this is one of the most popular options:
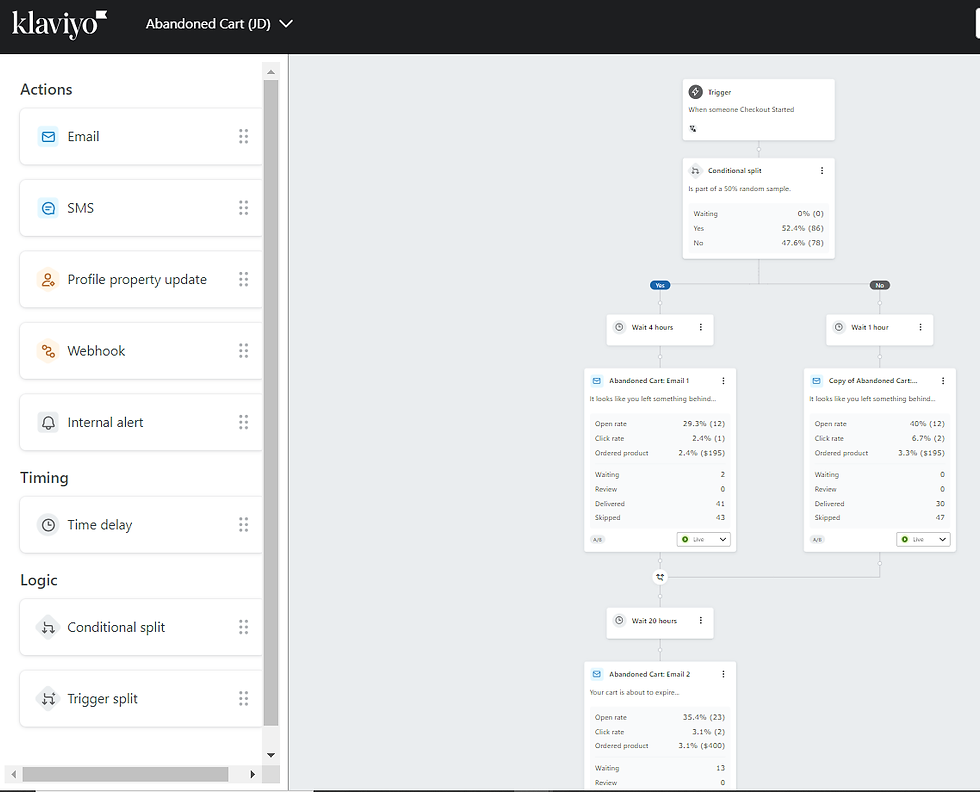
Use conditional & trigger splits, time delays and use multiple follow-up emails. Add incentives like discounts and countdown timers. Don’t rush creating the email design. Do it once well and it will pay dividends for a long time.
4.) Add or Fix all other Email Flows
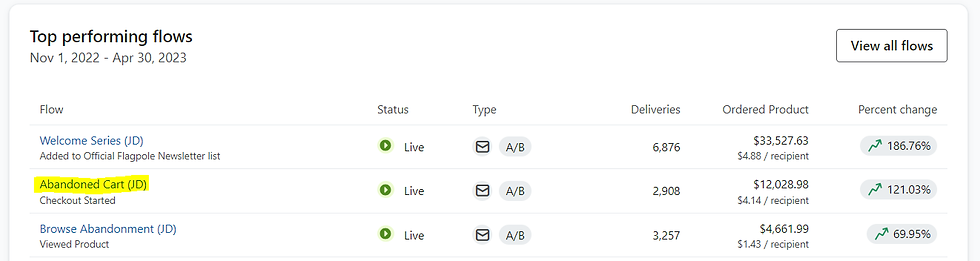
People have different names for them but there’s really only 5 - 6 flows that you need for your store. Here they are:
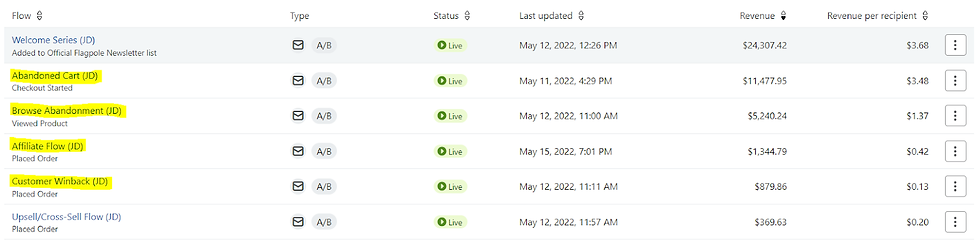
The ones highlighted in yellow focus on increasing the store’s conversion rate. The other ones help out as well, but might be geared more towards increasing the AOV like the post-purchase flow (I call it upsell/cross sell flow).
You can see the ‘A/B’ icon under the ‘Tags’ column. Instead of telling you what parameters you should use, you should simply just be A/B testing all the time. This can be easily integrated into your flows. That way you can customize all the flows specifically to your store.
5.) Add the same Flows above but now for SMS & Push notifications
So everything I mentioned above, do the same for SMS & Push notifications. Think about it, shouldn’t you leverage ALL the information your website visitors leave behind. And note this is not only email. Some leave their phone number at checkout, others allow their cookie setting on the browser to be saved (and shared with your store). So leverage everything!
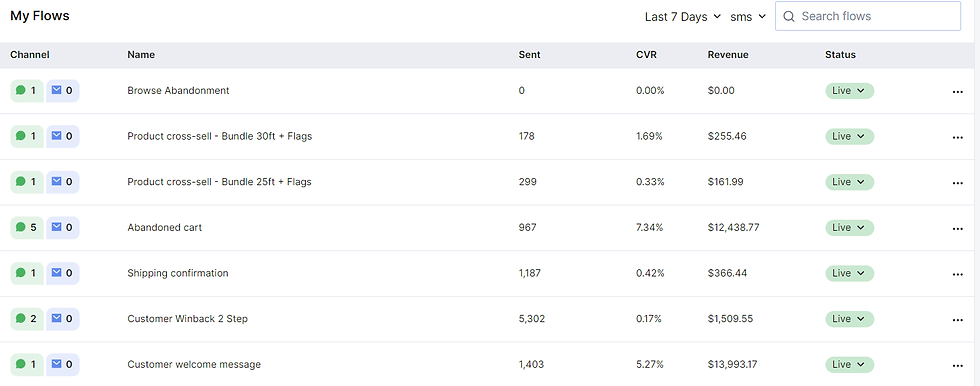
Here’s an example of some SMS flows:
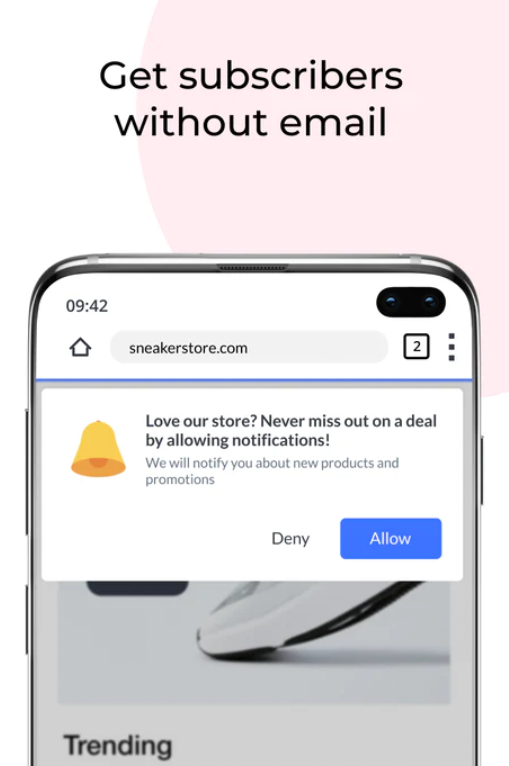
For push notification flows the app PushOwl is quite popular but there are several alternatives as well.
6.) Shipping Fee Optimization
Ok, how much you charge for shipping at checkout is directly correlated with how many people drop off (duh). It literally changes the most important thing for customers, the price, right at the last step before they press ‘pay now’. So quite important to optimise this.
Not only that but shipping fees are also revenue for your store. So it's a fine balance between not limiting your conversion rate while still increasing your AOV. A classic cost-benefit analysis, but a tricky one that many stores gloss over (because they “just want to cover their shipping costs” etc.). Let’s simplify it.
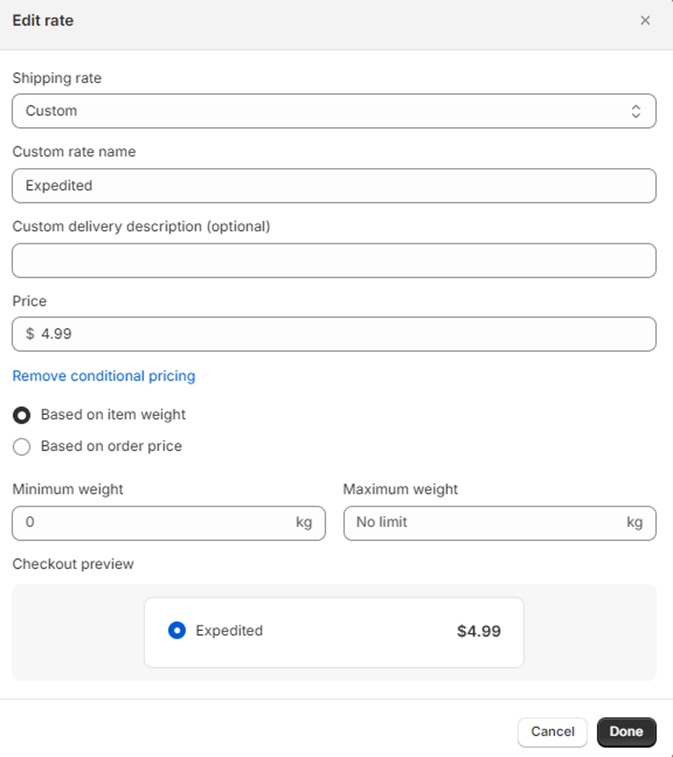
In your Shopify ‘shipping & delivery’ settings you can adjust 2 parameters by shipping rate: price and condition.

If you press on the 3 dots at the right to edit any rate, you can set the price conditions either by total weight or price of the checkout items.
Ok before I continue, yes of course all those settings will depend on your specific store and business models. Perhaps you are shipping pianos, which I’m sure you have some interesting conditions for. But the universal point I want to make is that whatever your current rates are, they can still be optimised for conversion rates.
First you should test what your average conversion rate is if shipping fees are at zero. This is your baseline and it is crucial to know. Perhaps you already do, but if not then its worth a 1 week test (yes this will not be totally accurate since it is difficult to isolate this variable, but here you are looking for a noticeable change). You can then start optimising from this baseline.
As a general rule of thumb, the following points will help you increase your CRO:
Always have multiple shipping options: this is what in economics is called ‘price discrimination’ where you charge various parts of your audience differently. Like in my example above, I have a free option, an expedited option ($4.99) and a priority & express option ($12.99). The differences between the 3 options are small, just slight changes to shipping speed and tracking. However, something like 5-10% of the customers always pay for the most expensive option because they simply don’t care and have the budget. At the same time, no one is scared off because the free option is always available (thus our CRO is not affected poorly). In fact, having multiple shipping options makes it seem that the store has a more sophisticated logistics system, thus increasing CRO in and of itself.
A/B test your free shipping threshold: most store’s will have a policy like “free shipping after $100 order value”. This free shipping threshold can play a huge role in your CRO. If you set it too high and most of your customers checkout below that level, the higher cost might make many of them drop off.
What’s the best way to check this? Go again to your ‘abandoned checkouts’ tab and download them into an excel.

In your excel you can use some basic CountIf formulas to see how many orders were below or above your threshold. Remember those are customers who DROPPED OFF at checkout, and are the best indicator of what went wrong in the last part of your funnel. Leverage that data.
To give you an example, for the store in the screenshot the free shipping threshold was at $200, so quite high. I ran the numbers and saw that indeed 81% of the abandoned checkouts were below that threshold and were hit with a $15 shipping fee as the cheapest option. This caused a massive dropoff at checkout. By A/B testing that threshold at lower levels such as $100 and $150, the store was able to optimise their CRO significantly.
(For the sake of time, I have a separate post where I go in more detail just on shipping fee optimization).
7.) CRO Split Analysis
Ok this is a quick but powerful analysis that every Shopify store should do. In the analytics dashboard under your conversion funnel tab, press ‘view report’. I highlighted it here:
Now in the top right of the table, you can breakdown the conversion metrics by different parameters. You should play with all of them but the two most powerful ones are: by country and by device type:

Above is just a random example, this data is highly personalised to your store. The point is that you should see your average conversion rate (3.85% in my example above), then see which countries (or regions) and devices are performing below your average. Those are now the areas you can focus on improving, which will give you the highest ROI.
I’ll give you an example. I was optimising a Shopify store that was primarily selling in Canada and the US. When doing this analysis I saw straight away that the conversion rate for the US was 3x lower than for Canada, a massive difference. I could then figure out that because the shipping rates (among other things) for the US were much higher, we could solve this problem and bring the average conversion rates higher (by fixing the weakest link).
Similarly I saw that mobile & tablet conversions were lower than desktop. Logically, we cleaned up the mobile view of their website and made it look fresh and modern. Again this was powerful because we had the exact data to identify the weakest link of the conversion chain and focus full force on that.
8.) Page Speed
I’m sure you heard those studies how companies like Amazon determined that every millisecond of page speed increased their conversion rate by some surprising percentage. Well in any case, I’m sure I don’t need to convince you that logically a faster website is a better website.
There are many external tools that evaluate your websites page speed. But now even Shopify built in their own tools directly on your main Themes page:
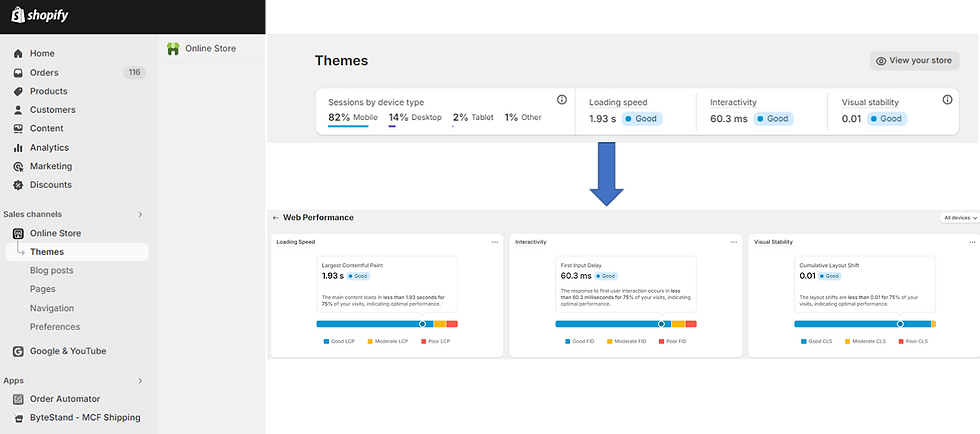
If you press the stats it will provide you with more details. Now I won’t go into all the ways you can improve your page speed but the point is, if your score is horrendous here then fix it! It will definitely help your conversion rates.
9.) A/B Testing price
If you A/B test anything about your main product page it’s the product price. Most people jump straight to testing their headlines, description or product images. All of those are important as well but pale in comparison to price.
Once a potential customer goes on your product page and understands the product, the most important thing they care about is price. Then come all the other variables.
Therefore start A/B testing your price first. There’s several apps that allow you to do that. Here’s an example of a one of them below:

For this projector, the page traffic was divided 50/50 to either the $69.95 or $79.95. Everything else on that product page stayed the same. In this example we can see that the $69.95 projector won, by having significantly higher revenue / 100 visitors.
Now you might be surprised to hear that then we ran another test, comparing $69.95 with $74.95, then actually the $74.95 won. This makes a huge difference to the store, selling each projector on average for $5 more without sacrificing their conversion rate (or ROAS), means a pure profit margin increase.
Continuously doing this for all your products will hands down give you the biggest return per time invested.
10.) A/B testing product page layout
Ok now that you have A/B tested your price (and only after that), you can test all the other variables on your product page: headlines, description, layout, product images, GIFS, design, color coding etc.
I would keep those separate from things you can add on with apps, such as sticky bars, countdown timers, badges, pop-ups, labels, animations etc. I would start with the fundamentals first, then work down to the ‘smaller’ add-ons. In fact you don’t need any of those add-ons if your core product page is strong.
You will always face the same challenges when doing A/B tests:
Not dividing the traffic ‘cleanly’ across your product page variants (you need to keep to a 50/50 split where the traffic sources are similar for both variants, thats hard to do)
Not testing one variable change at a time (to have a clean test you need to isolate one variable at a time. Testing multiple variants simultaneously will blur your results)
Not getting significantly statistical results (not having enough data to make a clear conclusion)
Trust me, you’ll be tempted to make those mistakes over and over again. It's not something that the human brain is good at doing naturally. But if you try hard enough you’ll learn valuable things about your store in anycase.
11.) Localising currency & language
Ok only relevant if atleast 5% of your traffic is from a country that does not have your primary language or currency. If you’re selling 100% in one country right now this won’t be as relevant, so just keep it in the back of your mind until you expand internationally.
For everyone else, check the country split in your analytics dashboard.
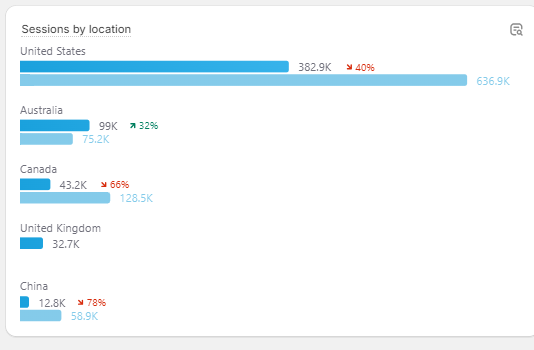
You might be surprised where some of your secondary traffic is coming from. Now there might be logistical constraints as to why you can’t sell in some of those countries, but those tend to be solvable.
This initial data might be the best indicator as to why you should consider expanding into the UK, Europe, Australia or any other country.
In any case, if you are selling in multiple countries an easy way to increase your conversion rate is to localize currency and language. There are many great apps out there that help you accomplish this. Importantly, they do it automatically based on the IP address of the potential customer. So for example, if you have someone from Germany go to your product page, it will automatically show it to them in German with all the prices in EUR.
Here’s a store that didn’t have this automatic IP switching feature:
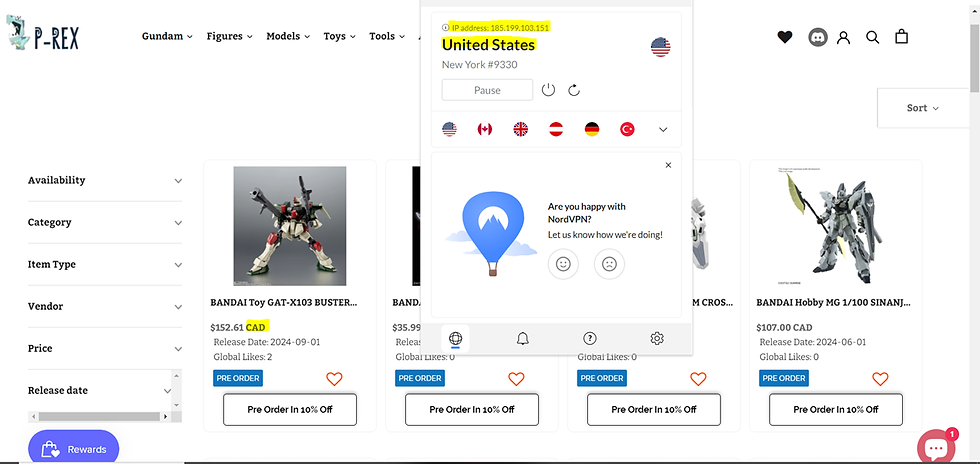
We fixed it by moving to another currency app that did implement the IP address functionality. Just switching this one feature can help improve your conversion rate significantly. It makes sense: locals want to see their local currency & language. Bonus points if you can go beyond that and create a local vibe as well.
12.) CRM improvement:
Most stores think of CRM as their customers complaining about something after the sale took place. In fact, for most stores there’s also a significant amount of customers contacting the store before their first purchase. It might be to clarify something about a product, see if you’re legit, check shipping times etc. Nailing those customer interactions will of course improve your conversion rate as well.
Now there is a clear cost benefit analysis here because being able to answer all those tickets and do so very quickly has a cost associated with it. Now you can automate large chunks of those tickets (see separate post on CRM automation), however you will still need some agents to be online. This is therefore really something for bigger stores that have already hit some scale.
However your CRM for tickets post-sale is also crucial to getting those customers to come back to your store to reorder (your retention). Therefore, it will improve your long-term conversion rate since each returning customer will improve it.
13.) Improving shipping speed (changing from dropshipping to 3PL)
We previously talked about optimizing shipping rates to improve your conversion rate. However, shipping speed also makes a difference. It is standard practice to put your shipping time either on the product page or FAQ pages (or similar).
Without clearly showing your shipping time on the website, your conversion rate will suffer as customers will expect the worst. Almost everyone made bad experiences with long shipping times or delays and of course tries to avoid that. Therefore, showing a faster and more predictable shipping time will help your conversion rate.
The biggest improvement most stores make in this regard is switching form a dropshipping to a 3PL model. Now there are pros and cons to each (some of them below):
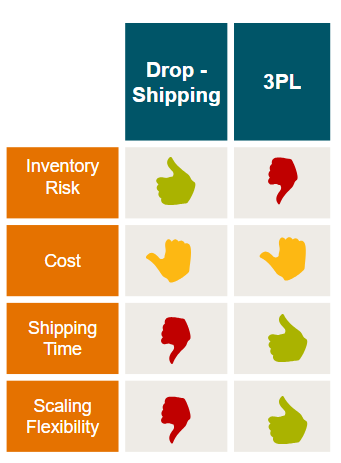
I won’t go into the pros and cons of dropshipping vs. 3PL here (I have a separate post just on this). Just keep in mind that offering faster shipping times and advertising that on your product pages, will improve your conversion rate significantly.
Be as specific as possible. If you can offer same day or overnight shipping, say so! If you can provide additional tracking and warranty, make that clear as well. The more details you can add, the more sophisticated your store will look like… leading to better conversions.
14.) Retargeting on main Marketing channels, and cross targeting
If you advertise on Facebook, you should also retarget there.
If you advertise on Google, you should also retarget there.
If you advertise on TikTok, you should also retarget there. ETC.
Retargeting is simply showing your ads again to your warm audience - people who already engaged with your content or website. The reason is simple: they will always be cheaper to convert than someone completely new, who never heard about your content before.
But here’s the thing, retargeting within each platform is not enough. It’s a good start but you should cross target warm audience between the different platforms.
Here’s the simplest example. People who see your ads on Facebook also use Google (well most of them) and vice versa. You can retarget your warm audience from Facebook also via Google ads (and not only within Facebook). At the very minimum, you should have a brand campaign on Google every time anyone searches your store name.
This makes the top of your conversion funnel even more tight and stops the ‘leaking bucket’ of your warm audience dropping off anywhere. My example above was just between Facebook and Google, however there is a large overlap of users between all big platforms. So do your best to cross target as many as possible.
Now again for the sake of time, I won’t go into the technicalities of how to set this up. You can search it online. Now that you know it's possible and effective, that’s the most important thing.
15.) Bulk discounts & bundling
Ok we already talked about up-selling, cross-selling, post-purchase flows etc. But there are additional things you can add to your product page. The two most common are bulk discount and bundling.
Both should be quite self explanatory, here’s an example of a bulk discount:
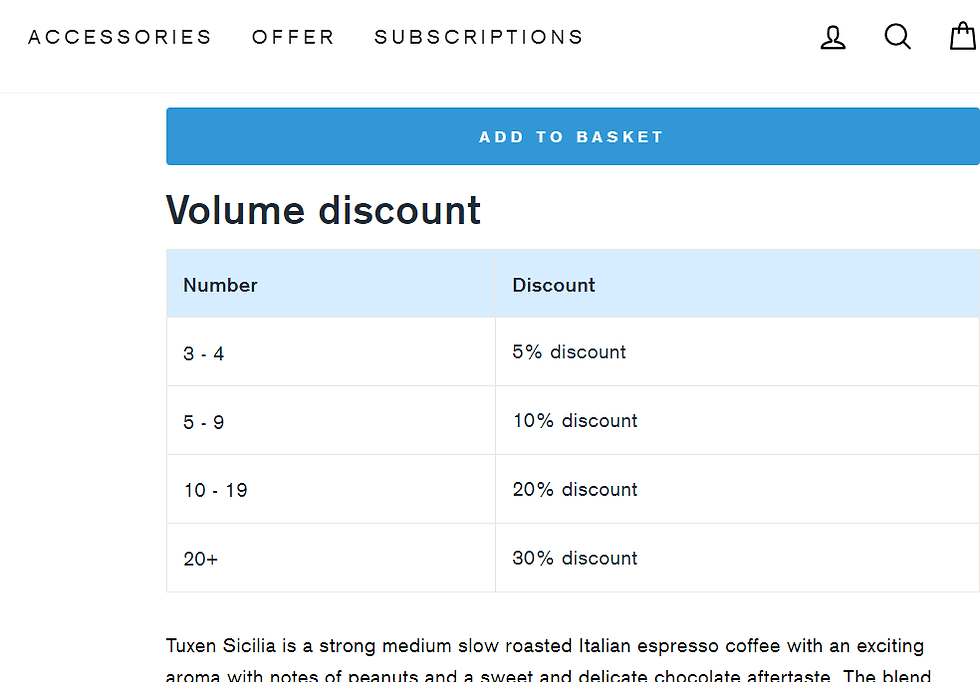
For this coffee, the more you buy the more you save. Simple and effective. If someone buys 20 units in one order, sure you are providing a big discount to your customer, however the order fulfillment will be much cheaper for you since you can ship in bulk to the customer.
Depending on the product your margin may not be affected too much, however you’ll be able to increase your conversion rate.
You can also bundle several of your products together. This is common practice on most Amazon listings as you probably know. So use it for your store as well!

Here is a classic bundle between coffee beans and coffee machine cleaning products. Those go hand in hand, if the customer already has the coffee machine that goes well with both products.
There are of course many different variations of bulk discounts and bundling. You could do things like BOGO, buy one get one (for free), or add other conditions to unlock certain discounts.
16.) Discount timers, badges, popups, stock-outs, sticky banners, animations etc.
Ok there are a bunch of apps that allow you to add a bunch of fluff to your product page. So my word of caution here, is be very selective with those options. Strong brands with solid product pages rarely use those features; or at most have 1 or 2.
There’s a few issues with those.
One is losing trust from the customer. Many people don’t trust countdown timers, messages saying there are only 7 units left in stock, or another customer in their city just bought 17 seconds ago. For good reason, most stores invent those things out of thin air.
Secondly, they are quite annoying. Imagine having 2 minutes to complete the checkout everytime. Stack this with 7 other pop-ups being thrown at you, and you might leave.
That being said, there's of course a time and place for some of those features. Especially if you are selling a low-ticket item at high volumes, some of those things make more sense. But don’t overdo it. They generally do not help build brand or trust from your customers.
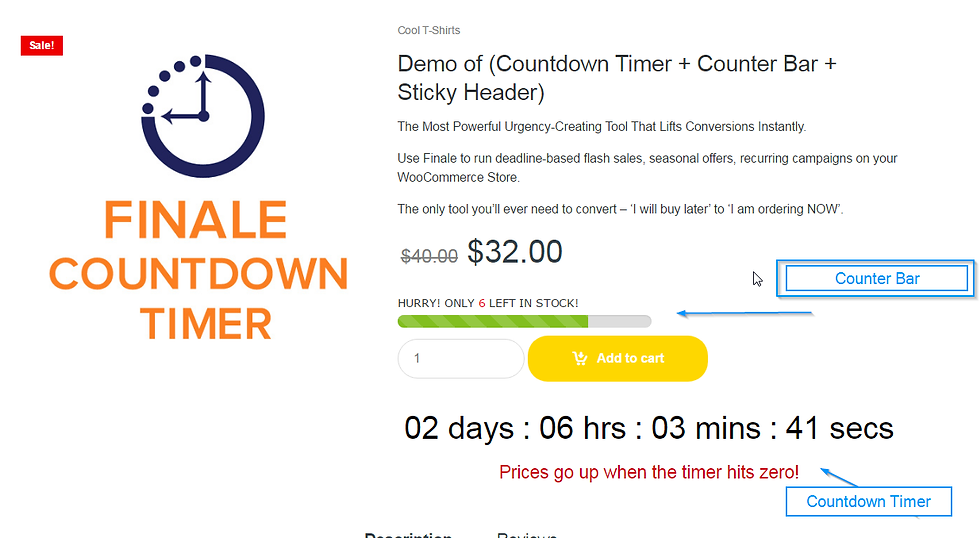
So with all of those warning out of the way, here’s a list of features you can consider:
Countdown timers
On the product page
On the add to cart page
On your email flows etc.
Sticky banners
Sticky add to cart banner
Sticky banner at the top or bottom of product page
Running out of stock messages
‘Only 7 units left in stock’
‘Buy now to secure our last batch…’ etc.
Urgency pop-ups & messages
‘Buy now to get same-day shipping’
‘Limited edition available until Wednesday’
Badges
‘Pay securely with…’
‘Trusted by XYZ customers’
‘Best Business Award for …’ etc.
Other pop-ups
‘Get 10% off if you sign-up today’
‘Exclusive March sale ending next week’ etc.
Animations
Add to cart buttons vibrating, moving, changing color etc.
News ribbon text under cart button
There’s a bunch more but I hope you get the idea. Again… don’t over do it.
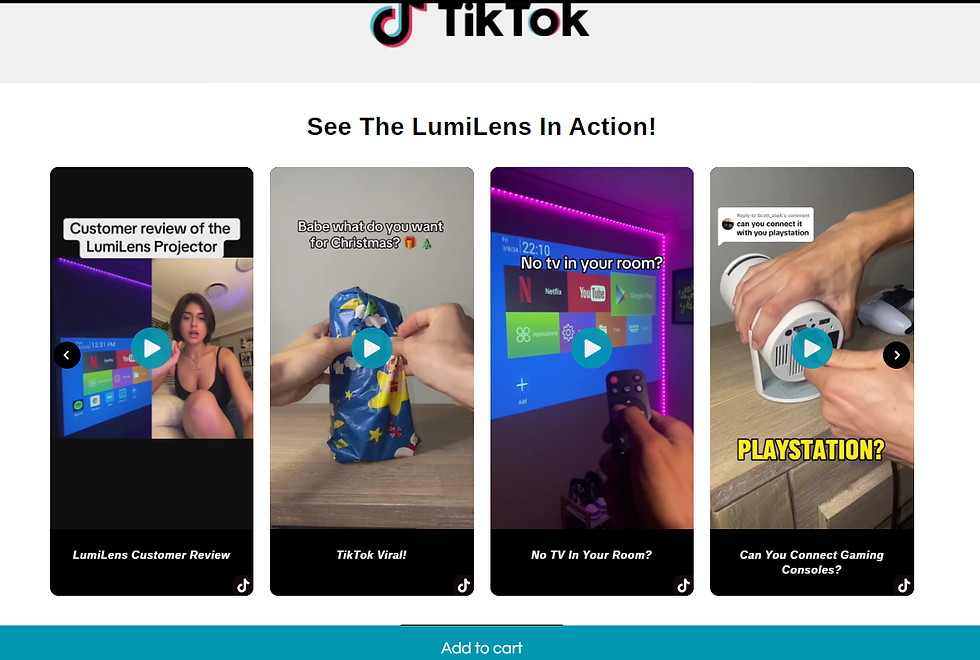
17.) Embed social media posts into your product page
If you have any content that performed well on social media, make sure to embed it onto your product page. There are a bunch of apps that allow you to do that easily.
For instance, if you have a TikTok post that did well about your product, put that into your product page and cross link it. Generally, wherever your best performing content is, add it to your product pages! It will create social proof, showcase your product better and increase your conversion rates.
18.) Have authentic reviews on your product page
Another classic social proof improvement, that you already probably know, is having good quality, authentic reviews on your product page.
Keep in mind, having image reviews is better than just text reviews. Having video reviews (yes that's a thing) is better than having just image reviews.
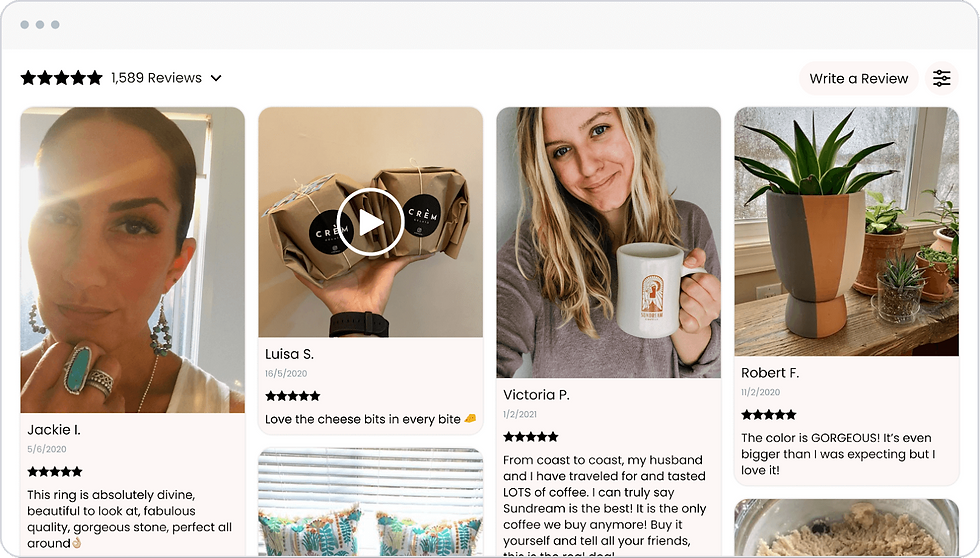
Most reviews on Shopify stores are fake, modified or redacted. You might be tricking some but most customers see through BS reviews. So stand out by having authentic ones.
______________________________________
Coming back to our Caldini Book…
Most of the points above fit into one of the 7 categories I mentioned in the beginning quite well. Here a quick summary:
Reciprocity
Providing value before the customer makes the first purchase
For example, welcome series flow providing upfront discount
Scarcity
Limited stock, banners, popups, countdown timers, limited edition etc.
Social Proof
Embed best social media posts on product page
Adding authentic reviews
Affiliates & influencers promoting your store etc.
Authority
Use brand name of influencers and add them to your product page
Badges & statements
Best Business Award …
Trusted by 17,000 customers…
Use celebrities where possible
Consistency
Be consistent with your tactics above, i.e. don’t have a discount timer only for Easter but then keep on using it anyway
Liking
Add a personal touch to your brand
Who is the face of the brand, and are they likable (humble, authentic, relatable etc.)
Of course most other steps just make sure your store is awesome and operating on all cylinders. You can and should go into the high-level ‘Influence’ strategies, but having a great product offering & operational processes will always be the basis for a successful funnel.
If you found this helpful, find more detailed information on our Artikuno Youtube channel.
PS. If you’ve tried all those steps above and your conversion rate didn’t improve, contact me and I’ll refund you for the time it took you to read the article (and maybe even help you implement some stuff).
Comments